Monday, February 4, 2019

February 2019 Fat Quarter Club

Tillalili Fat Quarter Club
February 2019

(Important club message at the end!)

Hello Members! 
   
    Do you remember I mentioned that some months might be a "Smorgasbord" of fabric?
Well, I had planned a new collection from Riley Blake for February but it hasn't shipped yet!!  So.... on to plan B! (which I am basically winging)

For the 5 FQ club I was able to curate a bundle from the gorgeous collection "Summer Blush" by Sedef Imer for Riley Blake.  Summer Blush will surely help get you started on Easter projects and/or Mother's Day gifts. 


The 10 FQ club is having a semi-Smorgasbord month.  There are various different curated bundles going out to the 10  FQ club members.  I'm keeping your color likes and dislikes in mind while curating these bundles. 

If you said yes on your registration form to receiving Stacy Iest Hsu panels, you are getting the TWO panels from the enchanting "Once Upon A Time" collection from Moda.  Each panel is the equivalent of 4 fat quarters.  You are also receiving 2 additional misc. fat quarters in either pink or lavender to compliment the panels, or to use as stash builders.

One panel is Princess dolls and a horse, while the other panel is an interactive castle tote.
It can easily be carried with the handles included.  These will be fun to embellish!
I can't imagine a little girl wouldn't love getting these in her Easter basket!!


I still had to figure out what to do about all the other club bundles.  Then I remembered I have a great stash of fat quarters put away for quilt shows.  Since I'm not a vendor at any quilt shows this year, I can use those!  I pulled out some fabulous Art Gallery Fabrics collections.  These collections are a rare find in shops or online these days.  

So some of the 10 FQ club members are receiving collections from the former Art Gallery Designer, Jeni Baker of  In Color Order.   I curated bundles using prints from Jeni's collections Geometric Bliss and Color Me Retro.  Some bundles will also include a few complimentary prints from the Art Gallery Fabrics Designer, Pat Bravo.  Pat and her husband Walter are the founders and owners of Art Gallery Fabrics.

I still didn't have enough fabric for all the bundles so some members are getting the ever popular "Sweetness" by Sandy Gervais.  Sweetness has the most beautiful shade of Taupe! This is the last of my stock so plan wisely.  There's a few precuts in my shop Tillalili.com while supplies last. 


It didn't stop there.  I ran out again! (at this point I'm shaking my head and laughing).
Luckily I had some extra bundles from last year with the Wistful Winds collection by Shari Butler from Doohickey Designs for Riley Blake.  Wistful Winds is a great, bright collection with lots of primary colors.  It's full of the happiest of colors! 


Hope everyone has gotten something they like and can use for the upcoming holidays in their home, or for gifts.  


Just a reminder, the club has a Facebook group for members.  Use the group page to share your bundles and projects.  You can also offer any FQs for trade that you may not want.  You never know, someone might love the fabric you don't and vice versa.  There's already been photos of great projects from January's bundle.  Click HERE and request to join.  The club is for members only. 


Important message to members: 
If you have any questions regarding the club, please check your welcome letter before emailing me with your question. I'm receiving a lot of emails with questions that were answered in the Welcome letter.  I would be happy to answer any question(s) you have if the answer is not in the Welcome letter. Thank you for your understanding and cooperation! 

PLEASE NOTE:  There has been another increase in postage.  Since the February bundles were already paid for, I am absorbing the cost of the increase.  Future invoices will be changed to reflect the increase.

USPS has gone back to shipping fees according to the destination of the article being sent.  Therefore, your shipping fees will not be the same as everyone else. Packages are shipped from CT.  The father away from CT, the larger the increase.  USPS is really making it hard for the "little guys" in business!

I would love to hear if you like the club newsletter and fabric information being on the blog.
Please comment below.  Thanks!


Friday, July 13, 2018

SAIL BOAT FPP

Are your days so busy you don't get to do the things you love and are passionate about? That's how I feel about designing.  My days are so busy with the quilt shop that I don't have enough time to design.

I keep my sketch book close by at night and sketch designs. One night in May I sketched an abstract rendition of a sailboat.  I could imagine it as a pillow or a table topper so I added just enough borders to make it finish at 16" or 20". 


I knew this design would have to be paper pieced so I showed the sketch to my talented friend and paper piecing expert Jitka, (@jitkadesign on Instagram).
Jitka asked for the measurements and within a few days sent me the PP pattern. She is amazing! Thank you Jitka! xoxo

Once the center block is paper pieced, the rest is regular piecing.  The pattern went together very quickly! I'm thrilled that the image in my head is now a reality!


The response to my photos on Instagram has been amazing. So many talented Makers want to make my pattern! That's the highest compliment I can get!

I'm going to work quickly to get this pattern written, tested, and published.

The pattern is meant for a pillow or mini quilt, but multiple sailboat blocks (10" finished each) can easily be made into a quilt just by adding sashing and borders.

I can't wait to see everyone's vision/version.


UPDATE!  The Sail Away pattern is now available at Tillalili.com


©2018 Tillalili, LLC - all rights reserved. Contents and photos on this blog are the property of Tillalili, LLC. No portion of this blog may be used without written permission of the blog owner.

Wednesday, November 8, 2017

SUMMER PICNIC QUILT PATTERN

Introducing Summer Picnic!  My 3rd quilt pattern.


"SUMMER PICNIC"
This pattern was inspired by a contest requiring a quilt or mini be made with only 5 fat quarters for the blocks, along with 2 other fabrics for the background, sashing, cornerstones, etc. 

I had previously designed the original sketch with squares in place of the half square triangles. At first I wasn't wowed with the pattern and pretty much just forgot about it.  When I heard about the contest, I thought about this pattern.  I had to change the squares to HSTs due to the fabric limitations and that was just what the pattern needed.  I loved it!


The fabrics I chose inspired the name Summer Picnic.  The quilt reminded me of a vintage table cloth my mother used to cover our picnic table when I was a child.  

I am so thrilled with this pattern, and it has quickly become my favorite of all the patterns I've designed so far.  Whether you like vintage, modern, or holiday, this pattern transforms with the change of the fabric.

The photo below shows the fabric choices from one of my pattern testers. The pattern took on a more modern, and even a Wintery, icey feel.  You can see the versatility of the pattern with just 5 different fat quarters!


So grab your fat quarter stash and head over to Tillalili.com and download your Summer Picnic pattern today!   Follow me on Instagram and post your finished quilts with #tillalilisummerpicnic.  I would love to see them! 


"Summer Picnic"
designed and written by Gwen Sager


©2017-2019 Tillalili, LLC - all rights reserved. Contents and photos on this blog are the property of Tillalili, LLC. No portion of this blog can be used without written permission of the blog owner.

Monday, May 8, 2017

2017 New Quilt Bloggers Blog Hop - Tillalili


Hello and WELCOME to my stop on the 2017 New Quilt Bloggers Blog Hop! 

This is the final week of the hop. If you've been following along, you've already had great explanations of what this group of talented ladies is all about.  If not, I'll give you the quick, condensed version.  We are a group of quilters who want to learn how to create a spectacular "quilt" blog you'll want to come back to. We shared tips, tricks, and critiques.  So far my blog has never looked better! I'm still learning though.

We were split up into hives for the hop.  I was really happy to have my button design (above) chosen to represent our hive "Let's Bee Quilt'n".  If you would like more details about the the group and all the hives, there will be links at the bottom of this post you will want to check out.  


A little about me.... (or maybe a lot, haha)

I've been involved in color and design as far back as I can remember.  After graduating from a high school that offered a large selection of art classes, (which I took most of), I majored in Interior Design at Paier College of Art.  I also went on to business school and earned a degree in Accounting, which was my smart mother's idea.  I have fallen back on that degree all my life, especially since running my own business. 

In my mid 20's I opened a brick and mortar craft shop. I was at the shop all day, gave classes at night, and sold my items at craft shows on the weekends.  I closed the shop within a few years, worked from home, and sold at craft shows. (It was before Etsy). 

Fast forward to about 4 years ago I found myself with an abundance of beautiful cotton quilting fabric from Riley Blake and Moda so I decided to open an Etsy shop just to sell off my stock. Little did I know that decision would make a major change in my life.  I started working with talented quilters and curated beautiful bundles of fabric.  Before I knew it, I was working 12 to 15 hours a day, 7 days a week selling fabric.  TillaliliFabrics.etsy.com

I have always been interested in quilting, and now that I was selling the fabric, it was time to learn to quilt. Late at night I started watching a Missouri Star Quilt YouTube video over and over until I finally got up the nerve to try it.  I don't know what I was so scared of because it turned out to be a lot of fun, and was fairly easy.  After another video with Jenny, this time on binding, I hand sewed the binding.  I love to hand sew! Not a bad corner for my first time! 


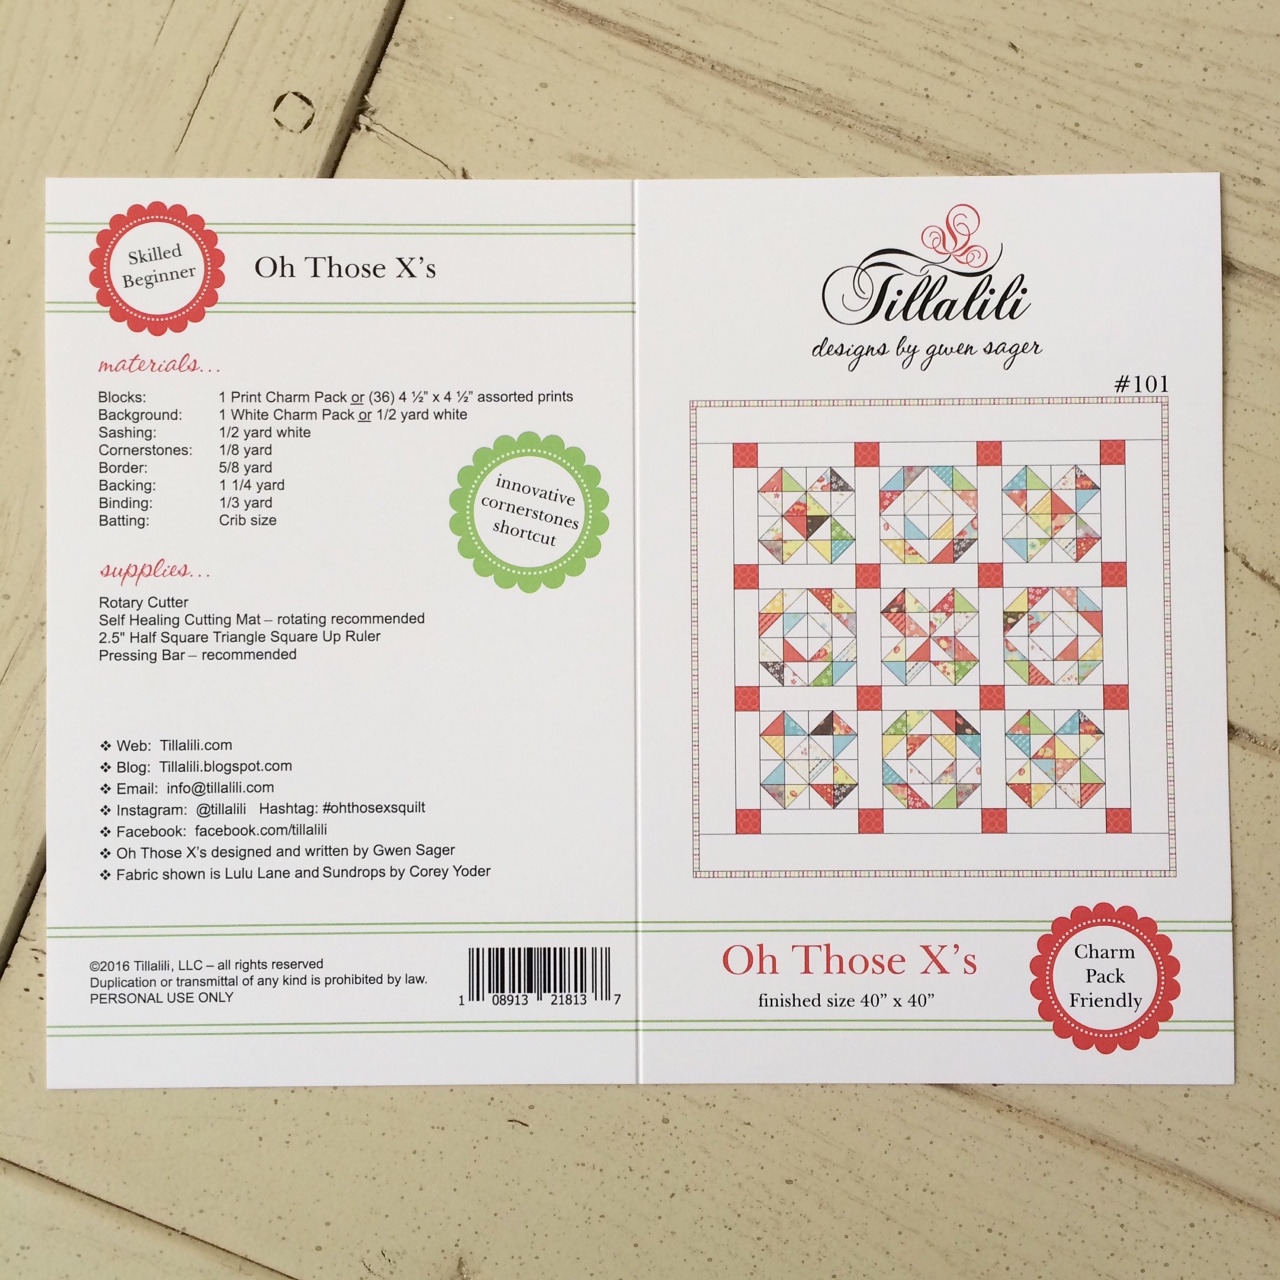
After joining Instagram I quickly got into testing patterns for quilt designers.  In 2016 I tried designing my own original quilt design.  I loved it!  So with sketch pad in hand, I started drawing quilt designs at night.  But taking a pattern from a design on paper to illustrated instructions isn't as easy as it looks, and it takes a lot of time.  I'm very proud to say, in January, 2017 I published my first official quilt pattern called "Oh Those X's" which only requires ONE print Charm Pack! (available on Craftsy and Etsy).


pattern back and front cover

I have many more patterns to come. I'm also finding easier ways to construct quilt blocks.  You will love my innovative shortcut to cutting cornerstones.  No more cutting each individual cornerstone! yay!

Here's a sneak peek at my next pattern that's almost ready to publish...


From the Heart

(jelly roll friendly)


A few tips...

Designing patterns has made me aware of just how important it is to accurately measure and cut your quilt pieces.  Take your time.  Use the right tools, such as a grid ruler.  Have a sharp blade in your rotary cutter.  All these things make a difference.

Another VERY important part is to have an accurate seam allowance.  If you aren't sewing with an accurate 1/4" seam allowance, no matter how accurately you cut, your blocks won't be the correct finished size.  Sew a seam and measure it.  You may be surprised.

If you find your block is a little short, try sewing it with a scant 1/4" seam.  Pressing your seams open on certain blocks will also help.


About the name...

I'm often asked about the name Tillalili.  Tillalili is named for the two crafty influences in my life. One being my maternal grandmother, and the other, my Aunt Lilly. 

My grandmother immigrated to the U.S. in 1913.  I looked up the ship's manifest and her name was listed as Tilla.  She was an amazingly talented seamstress. She made men's suits, my mother's wedding gown, all the draperies in my childhood home, etc.  She was my first introduction to sewing.  

My Aunt Lilly, also my Godmother, was my introduction to knitting, crocheting, and painting. She was a talented artist, among many other talents including a non-professional opera singer. Her and I were extremely close.  She was a great source of encouragement and support. 

They are my Angels watching over me. ♥♥♥

-----

Well, that's it for my stop on the blog hop. Thank you for stopping by.  I hope you enjoyed it!
Follow me on Instagram for the latest fabric news, giveaways, and pattern releases.

Please take a minute to jump over to the other members of my hive that are posting today and see what they're up to.  Don't forget to enter the giveaway!

Sharon  - Yellow Cat Quilt Design 

Becca  -  Pretty Piney

Wendy  - Pieceful Thoughts of My Quilting Life

-----


Click on any button for detailed info on the hive, it's host, and Rafflecopter giveaway.


----


©2017 Tillalili, LLC - all rights reserved
Contents and photos on this blog are the property of Tillalili, LLC.
No portion of this blog can be used without written permission of Tillalili, LLC.

Sunday, April 2, 2017

Hugs All Around

I love making pillows!  When you don't have enough time for a large project and need some instant gratification, a mini charm pack pillow is a great, quick project.  


I recently got on board with a project planner, and I'm so glad I did.  Choosing a planner wasn't easy. There's so many good ones.  I ultimately chose the "Scrappy Project Planner" by Lori Holt of Bee in my Bonnet.  Not only can you plan and design your own projects, Lori also included patterns. There's a great section on Tips & Organizing, too!

So the other night I grabbed my new planner and a Coney Island Mini Charm Pack and sketched out a simple design I'm calling "Hugs All Around". With a little help from my calculator, I did the math.  Some times the calculations are trial an error, but you can always add to the border if the "calculator" didn't work. (wink wink)


I like to lay out my mini charms and take a photo once I find what looks good to me.  There's no right or wrong to this step.  It all depends on what looks good to you. Having the photo saves a lot of time if the mini charms get mixed up while stitching.  I like to chain stitch when I can and most times the layout gets messed up.  Just refer back to your photo and save lots of time! 


Once the top was pieced came the decision all quilters struggle with.... How do I quilt it? 
I, personally, love straight line quilting and crosshatching for pillows, but this pillow will be used in my quilt show display among other pillows with those types of quilting.

I wanted to do something different this time to make the pillow, and display, stand out. I tried circular quilting once before and it was a disastrous fail.  I didn't think I would ever try it again, but I felt my quilting skills have steadily improved enough to give it another try.


I've been asked several times how I did the circular quilting.  I started by making a small circle in the center.  I actually used the bottom cap from a spool of Aurifil thread.  Did you know the bottom cap comes off?  I didn't know that for the longest time.  That's where the end of the thread is to start the spool. (ugh)  I traced around the cap for my starting circle.  For the next circle, and all the circles after, I followed the previous stitches as a guide for my pressure foot.

You have to go slow and ease your project into the curve. Don't lift your pressure foot and turn the pillow.  It will give you jagged points. Have patience and go slow. This pillow took more than 4 HOURS to quilt, so I quilted it over 2 days.  


Once the quilting was done, I squared it and made a simple envelope back.  I didn't have any Coney Island yardage yet for the binding, but rather than wait, I chose a complimentary print from Strawberry Fields Revisited I had in stock.  It had most of the colors in Coney Island and matched beautifully. 


Hope you like my new pillow pattern "Hugs All Around"  


I would love to know if you are interested in a free tutorial for this pillow pattern.  
Please leave a comment and let me know.  Thanks!! 


Fabric Shown:  Coney Island
Designer:  Fig Tree and Co.
Manufacturer:  Moda Fabrics
20" Pillow Insert:  IKEA $6


©2017 Tillalili, LLC - all rights reserved
Contents and photos on this blog are the property of Tillalili, LLC.
No portion of this blog can be used without written permission of the blog owner.